WPF, XAML, and C#: Integrating Windows 10 Features

WPF, XAML, and C#: Integrating Windows 10 Features
The following blog post presents a step-by-step guide on how to integrate Windows 10 features with your WPF desktop application written in C#, including the ability to display toast notifications ot the user.
Requirements
In order to integrate this functionality, you are going to require the following pieces of software.
Software
Packages
Using these NuGet packages is entirely optional, but are recommended for an easier development experience. This includes the creation, formatting, and presentation of toast notifications
Concepts
You will first need to familiarise yourself with some high-level concepts that are used including COM classes and objects, AppUserModel, and shell links.
Toast Activator
Your desktop application will require an implementation, or class definition that can be used for handling toast notification activations from the operating system (i.e. in this case Windows 10). This is a class that can receive signals or requests from Windows 10 whenever a user interacts or engages with a toast notification either from the hub or the prompt once it is displayed. It looks something like this.
// The GUID CLSID must be unique to your app. Create a new GUID if copying this code.
[ClassInterface(ClassInterfaceType.None)]
[ComSourceInterfaces(typeof(INotificationActivationCallback))]
[Guid("replaced-with-your-guid-C173E6ADF0C3"), ComVisible(true)]
public class MyNotificationActivator : NotificationActivator
{
    public override void OnActivated(string invokedArgs, NotificationUserInput userInput, string appUserModelId)
    {
        // TODO: Handle activation
    }
}
This code snippet defines the class that will be responsible for handling with requests from the toast notification once a user engages with it. The invoked args can be defined at a later stage once we construct the toast notification.
You will need to associate your application with a GUID that can be easily (and freely) generated from an online tool such as this website. Replace the example GUID string in the GuidAttribute with the one that you generated.
Project Setup
You will need to modify your existing C# project before being able to proceed in enabling toast notifications or other Windows 10 features in your application.
Open up the *.csproj file for your project in a text editor, and place the following XML elements below.
<PropertyGroup>
...
    <TargetFrameworkVersion>v4.7.1</TargetFrameworkVersion>
    <TargetPlatformVersion>10.0.17763.0</TargetPlatformVersion>
...
</PropertyGroup>
Change the version number of TargetPlatformVersion to the version number of the Windows 10 SDK that you have installed. Once completed, you will be required to reload the project when returning to Visual Studio. You should now have the ability to add references to WinRT references and libraries through the Reference Manager for the C# project.
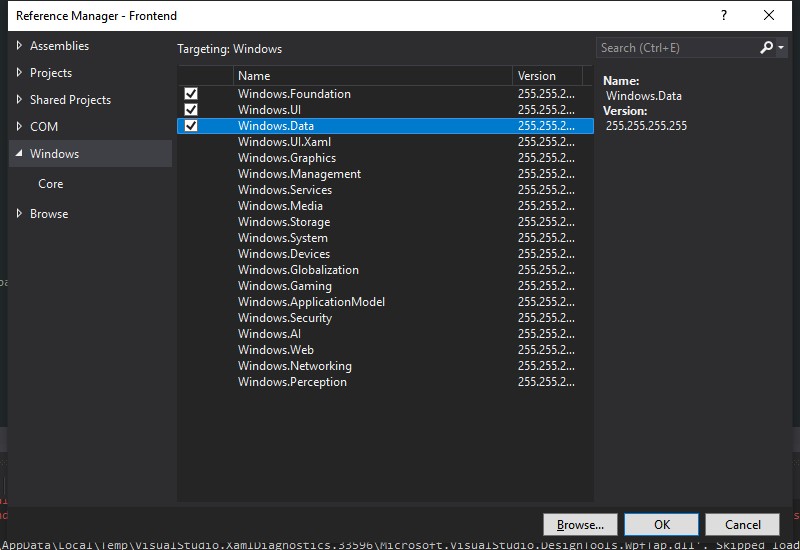
Next, you will want to add references to a couple of WinRT references (*.winmd). Add references to Windows, and Windows.UI.

A picture of the reference manager window for the Visual Studio project.
For convenience, you will likely want to make use of this particular third-party package for invoking toast notifications without the setup.
Start Menu Shortcuts
As stated in the MSDN documentation for toast notifications, in order for it to work your application must have an associated shortcut in the Start Menu folder for Windows 10, that contains the CLSID of the COM object that is used for handling operations from Windows 10. You can make use of the following code snippet for resolving the absolute path to the Start Menu for the current user.
Shortcut Properties
You can make use of the following third-party NuGet packages for creating a shell link to your desktop application, and appending properties to it also. As mentioned above, you are going to need to add a property to your new *.lnk (Start Menu shortcut) that specifies the AppUserModelId.
Resources
- MSDN Documentation - Integration of toast notifications with C# desktop applications
- MSDN Documentation - Code sample for integrating toast notifications with desktop applications
- MSDN Documentation - Code sample for sending toast notifications from your desktop application
- MSDN Documentation - COM Fundamentals
Comments
Comments
They're the best team yyou could get advice from should you be thinking about investing in Bali.